Carcass Featured Projects
Carcass Builds
Want more content like this?
Join the PowerNation Email NewsletterParts Used In This Episode
Matco Tools
Matco Tools Spotweld Cutter
The Industrial Depot
Tools, Hardware, Shop Supplies
Episode Transcript
(Jeremy)>> You're watching Powernation!
(Jeremy)>> Today on Carcass we start tearing into the interior of our spec Miata race car getting ready to install the new racing seat.
(Jimmy)>> Then we build a custom roll cage to keep us safe when we're out on the track. [ MUSIC ]
(Jeremy)>> Hey guys, welcome to Carcass. Well as you can see we got the Miata up here on our wheel stands and it's time to start transitioning this thing from the daily driver that it is into the spec Miata race car that we want it to be, and the last time you guys saw this we had a little bit of fun on the race track and then we ran down it down to Engine Power and got a base horsepower number. We managed to throw a couple of little things at it and gain about five horse, which could be the difference between winning and losing.
(Jimmy)>> In a class as tight as spec Miata that's a huge deal. Now the first thing we're gonna do to turn this thing into a race car is mount a racing seat, and then build a roll cage around it, and as far as research goes and for how tall we are we're thinking we're gonna have to mount the seat to the floor pan itself and as far back in the car as possible, and we do have a rule book on hand because some of the interior panels we will need to keep in the car and we don't want to throw anything away that we'll need. So otherwise let's just get this thing apart. [ MUSIC ] [ drill humming ] [ MUSIC ]
(Jeremy)>> These are really light. Not a whole lot to them. Removing the interior is pretty straightforward. We just need to get everything out of the way to make room for our roll cage. [ drill humming ] [ MUSIC ] [ drill humming ]
(Jeremy)>> Use that Jimmy.
(Jimmy)>> Oh yeah! [ MUSIC ] [ drill humming ] [ MUSIC ]
(Jeremy)>> Won't be needing that anymore. [ drill humming ] [ MUSIC ]
(Jeremy)>> Get these disconnected somehow. Get the radio out of the way here. [ MUSIC ] Got a couple of connectors underneath here to do. There's one up here for the heater vent. We've just got to pull that off. It's just this clip, pull this back. There's that one. I'll clip these two guys, and then I'll go over to the driver's side. We'll get the horn out of here and air bag too. [ drill humming ] [ MUSIC ] [ drill humming ]
(Jeremy)>> Come down! Alright, we can just get rid of this completely. I'll get the cluster out of it. [ MUSIC ] Get this out of here. [ MUSIC ] Get the dash out. We'll keep moving on. [ drill humming ] [ MUSIC ]
(Jeremy)>> There it goes! Look at that!
(Jimmy)>> There it goes.
(Jeremy)>> And then all we've got left is the antenna. Shazam, I'll take it! That was simple enough.
(Jimmy)>> Yeah it was pretty easy. [ MUSIC ]
(Jeremy)>> Alright got a couple more things to do on the interior here. We're gonna go ahead and pull the convertible top off. Then we're gonna come down here and drill out these seat risers, but first I'll start right here with the top. Get inside this thing and take out a couple of bolts. [drill humming ]
(Jeremy)>> Jimmy you want to give me a hand here? Get this thing out of here somehow, maybe? [ MUSIC ] If you guys are taller it may be a good idea to remove these stock seat brackets. What that's gonna allow you to do is slide your seat further back and get it sitting a little closer to the round and make this tiny car a little more comfortable to drive. [ drill humming ]
(Jeremy)>> After center punching our holes, we'll use our Matco Tools spot weld cutter. At first we'll just apply light pressure as we start to cut, and then once we get a hole we'll bare down on it and get rid of the weld. [ tapping metal ] [ clanging metal ]
(Jimmy)>> Coming up, we mockup and build mounts for our new seat, and then start building the backbone of our new roll cage.
(Jeremy)>> Well now that we have the interior out of the spec Miata, we're gonna go ahead and start building the roll cage and mounting up this Kirkey racing seat that we got from Summit Racing. Now Jimmy and I have already set it in here. So, we have a base idea where it's got to go. So, I'm gonna have him build the front part of the mount here and I'll go ahead and take care of the back cause that just bolts directly to the floor pan. Then once it's installed, we'll go ahead and start bending some tube and build the roll cage. That looks like about five inches. Using a piece of cardboard, we'll do a quick layout of the design and cut it up. That should work! Jimmy this is the front bracket for the seats. Can you whip two of those out? One's got to be bent one way; one's got to be bent the opposite way. Then I'll mount the back. [ MUSIC ] [ torch hissing ] [ MUSIC ]
(Jeremy)>> While Jimmy's making the brackets for the front of the seat I went ahead and drilled the holes to mount the rear of the seat. Now we're also gonna be adding these little spacers. They're gonna bring the seat up just a little bit and it's going to help disperse the load so the bolt doesn't pull right through the floor. [ welder crackling ]
(Jeremy)>> Alright, now we'll mount the seat. [ MUSIC ]
(Jimmy)>> Here you go, two brackets!
(Jeremy)>> Mark these. We'll get the seat installed then. [ MUSIC ] Alright, get the seat out of here, drill some holes, re-install it and be done. [ drill buzzing ] [ MUSIC ] [ drill humming ]
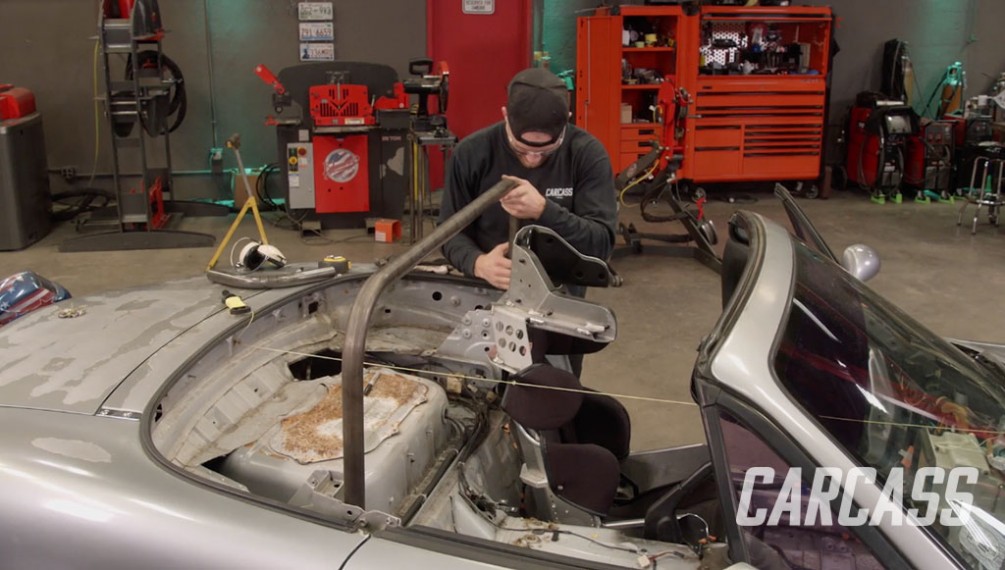
(Jimmy)>> We've got the seat installed in the car now. So, I can start working on the cage, and in most cases that starts with the main hoop. So, I'm gonna take some measurements at the car, cut and bend this tube, and we'll get it in. [ MUSIC ] To make the main hoop I find it a lot easier to measure from the center of the car out. So, what I'm doing with the string here is I tied one side to a bolt that's in the center of the dash, and there's a stud on this side that fixed the convertible top to the car and this is also in the center. So once I get this string in here, I can take our cheater tube, place it where our main hoop is gonna land, and then I can measure from the center out to our bend line, and then I can calculate the total length of tube we're gonna use. So, I've just got to get this on here. Then we'll start measuring. [ MUSIC ] Alright so all we're doing right now. Jeremy's gonna help me with this. We're just gonna measure for the center portion of the main hoop. This is obviously way too low for the main hoop but after we can take a height measurement and then total up for the length of the main hoop. That's about 17, okay.
From before we took a measurement for the total height of the main hoop from the package tray. So, we kinda know where we're gonna land to stay under the top.
(Jeremy)>> So on that mark you landed about 20 and three quarter, 21, something like that.
(Jimmy)>> 21 times 2, 17 times 2, seven and a half times two.
(Jeremy)>> So write all that down so you don't forget. 91 inches. [ saw buzzing ] [ MUSIC ] [ mechanical humming ]
(Jimmy)>> On the dot! [ mechanical humming ]
(Jimmy)>> Alright let's see how we did. [ MUSIC ] Yep, lands dead center in each pad. So that's pretty good. We'll tack it in, and then we can get to the rest of the roll cage.
(Jeremy)>> Don't go away. The assembly of our spec Miata roll cage takes shape with some added custom touches.
(Jimmy)>> I've got the main hoop in with a couple of down braces, and I can start moving forward. The next thing I'm gonna do is work on the harness bar and the diagonal brace for the main hoop. Something to note here that's very common with these cars is that the harness bar will actually go out behind the plane of the main hoop to make sure there's enough room to install the harnesses correct, and it's nothing too crazy but it will take some small adjustments and trimming to make sure the joints are good on both sides. I'm just gonna take a basic measurement here to get an idea of how long it will be, and I'll give myself some extra just to make sure. We're looking at about four feet, but I'll probably cut it at five, and that's where we'll start. [ saw buzzing ] [ mechanical humming ] [ MUSIC ] [ saw buzzing ] [ grinder buzzing ] [ MUSIC ]
(Jimmy)>> Alright so we've got the first bend and notch in the harness bar, and so now obviously you can see that it sits way behind the main hoop. So, I've got two more bends in it. One to bring it back in plane and then another bend to straighten it out. [ MUSIC ] [ mechanical humming ] [ MUSIC ]
(Jimmy)>> Alright everything looks parallel. [ mechanical humming ]
(Jimmy)>> And let's see.
(Jeremy)>> I bet it fits perfectly. Where you at, there-ish?
(Jimmy)>> Just above the seatbelt mount.
(Jeremy)>> That seems alright.
(Jimmy)>> Let me get my helmet and we'll tack it in.
(Jeremy)>> Okay I'll hold it. [ welder buzzing ]
(Jimmy)>> Flat foot. [ MUSIC ]
(Jimmy)>> Alright, installed! Cross brace, right there! [ MUSIC ] Eight and 15, 28 and 15! Alright now before we actually tack in these diagonal brace pieces I do have to fully weld this portion of this joint because this tube will cover it and I want to make sure that we get a full weld around every tube, and then once we do that and get these pieces tacked in we're actually gonna take this whole main hoop assembly all the way out, put it on the table, and fully weld all these joints. [ welder hissing ] [ grinder buzzing ] [ MUSIC ] [ welder hissing ] [ MUSIC ]
(Jeremy)>> It looks pretty.
(Jimmy)>> It should fit pretty nice.
(Jeremy)>> I hope so, otherwise you've got to do it all over again. You want it all the way to the leading edge, right?
(Jimmy)>> Yes!
(Jeremy)>> That'll work.
(Jimmy)>> Alright, just tack it in.
(Jeremy)>> Yeah, I'll hold it. [ MUSIC ]
(Jimmy)>> Alright we've got the back half of our cage installed. So now we can keep moving forward and work on the front.
(Jimmy)>> At a basic level building roll cages comes down to cutting, notching, and welding. Building roll cages for off road stuff is pretty subjective but building roll cages for race cars like this that compete in a specific class you have to make sure that you follow any rules specified in the rule book. [ saw buzzing ]
(Jimmy)>> Perfect! [ MUSIC ]
(Jeremy)>> Dude that cage looks great!
(Jimmy)>> Thanks, got a couple more things to weld up, and then get the harnesses in it and we'll be ready to move on.
(Jeremy)>> Yeah you go ahead and slam them in. We'll get it off of these blocks here, and then over on the hoist and keep rolling.
(Jimmy)>> We'll take the next steps turning our Mazda into a track titan.
(Jimmy)>> We've got the cage all wrapped up in the car and the only thing left to do is paint it along with the rest of the interior, and now we're ready to move on with the rest of the car.
(Jeremy)>> So the idea from here is to follow the spec rule book and turn our stock daily driver into a competitive track car. Now we already went ahead and bumped up the timing, and we swapped out the exhaust. Then we stripped the interior, added a role cage, and racing seat to make sure we were safe. So now the plan from here is to remove the sub-frame and trans to upgrade our clutch. With the sub-frame out, we'll tackle the suspension with a new set of struts and springs, plus throw in a bigger set of sway bars. To slow down in the corners we'll upgrade the brakes with a bigger set of pads and rotors, and then top them off with a custom set of wheels and track specific tires. At the end we'll wrap the whole thing up by taking care of the faded-out paint and do an easy color change to give it a fresh look. So, the next thing we're gonna tackle is the getting out the engine, the transmission, and the sub-frame. That way it's gonna make our lives a whole lot easier when it comes time to doing the clutch, the suspension, and the brakes. [ MUSIC ] Stripping down the top side of the engine is pretty easy. Just a couple of electrical connections... [ MUSIC ] ...we'll disconnect some hoses, and get rid of some fluids. Let's see if I can do this without making a huge mess but no guarantees. [ MUSIC ] That's a lot of coolant. [ MUSIC ] Slower is faster in this game and I don't want to have to mop up. [ MUSIC ] Nice! We'll take that. Cool, that'll work. Now we'll go up top. [ MUSIC ] Nice! [ MUSIC ] [ air hissing ] [ MUSIC ]
(Jeremy)>> Ooh, making a mess! [ MUSIC ] We'll have to disconnect the steering as well, and the heater core hoses. [ mechanical humming ] [ drill humming ]
(Jeremy)>> Next are the wheels and tires, followed by the calipers. And since we're gonna reuse these, we'll hang these up. [ MUSIC ] [ drill humming ]
(Jeremy)>> Alright guys, so what exactly are we doing? Well up underneath the Miata here is this sub-frame, or they also call it a cradle. Now what that does is it holds the engine, transmission, and the front suspension in the car, and then what they do is they just bolt this whole thing up into the body of the car. So, what we're gonna do is take this all down and set it on a set of jack stands with the engine, transmission, and front suspension in place. That's just gonna make it a whole lot easier to work on everything. They're pretty simple to get out. Just a series of bolts. So, we'll get these bolts out of here, set up some jack stands, get this thing on the ground. [ drill humming ] [ MUSIC ] [ drill humming ]
(Jeremy)>> Okay so now we're gonna pull the sub-frame out, but all we're gonna do is just loosen the bolts a little bit, and then we're gonna set this thing down on the ground on a set of jack stands. Then we'll come back, take the bolts out the rest of the way, and pick the car up. [ drill humming ] [ MUSIC ] [ drill humming ] [ MUSIC ] [ mechanical humming ]
(Jeremy)>> Alright Jimmy, you want to watch that side so we don't catch anything? [ mechanical humming ]
(Jeremy)>> I think we're clear. I don't know if I forgot anything. [ mechanical humming ]
(Jimmy)>> I don't see anything hanging.
(Jeremy)>> That's pretty simple. That's definitely the way to do it, drop everything clean out. Even if you don't have a hoist you can still do it that way. I mean it's a little easier for us. We get to pick it up, but you could still take the cradles out from underneath it, and guys find interesting ways to get the bodies up off top of them.
(Jimmy)>> Just like researching what everyone else did that's how we figured this out.
(Jeremy)>> Yeah that's a simple way to do that.
(Jimmy)>> If you like anything you've seen on today's show be sure to check out more of Powernation TV.
Show Full Transcript
(Jeremy)>> Today on Carcass we start tearing into the interior of our spec Miata race car getting ready to install the new racing seat.
(Jimmy)>> Then we build a custom roll cage to keep us safe when we're out on the track. [ MUSIC ]
(Jeremy)>> Hey guys, welcome to Carcass. Well as you can see we got the Miata up here on our wheel stands and it's time to start transitioning this thing from the daily driver that it is into the spec Miata race car that we want it to be, and the last time you guys saw this we had a little bit of fun on the race track and then we ran down it down to Engine Power and got a base horsepower number. We managed to throw a couple of little things at it and gain about five horse, which could be the difference between winning and losing.
(Jimmy)>> In a class as tight as spec Miata that's a huge deal. Now the first thing we're gonna do to turn this thing into a race car is mount a racing seat, and then build a roll cage around it, and as far as research goes and for how tall we are we're thinking we're gonna have to mount the seat to the floor pan itself and as far back in the car as possible, and we do have a rule book on hand because some of the interior panels we will need to keep in the car and we don't want to throw anything away that we'll need. So otherwise let's just get this thing apart. [ MUSIC ] [ drill humming ] [ MUSIC ]
(Jeremy)>> These are really light. Not a whole lot to them. Removing the interior is pretty straightforward. We just need to get everything out of the way to make room for our roll cage. [ drill humming ] [ MUSIC ] [ drill humming ]
(Jeremy)>> Use that Jimmy.
(Jimmy)>> Oh yeah! [ MUSIC ] [ drill humming ] [ MUSIC ]
(Jeremy)>> Won't be needing that anymore. [ drill humming ] [ MUSIC ]
(Jeremy)>> Get these disconnected somehow. Get the radio out of the way here. [ MUSIC ] Got a couple of connectors underneath here to do. There's one up here for the heater vent. We've just got to pull that off. It's just this clip, pull this back. There's that one. I'll clip these two guys, and then I'll go over to the driver's side. We'll get the horn out of here and air bag too. [ drill humming ] [ MUSIC ] [ drill humming ]
(Jeremy)>> Come down! Alright, we can just get rid of this completely. I'll get the cluster out of it. [ MUSIC ] Get this out of here. [ MUSIC ] Get the dash out. We'll keep moving on. [ drill humming ] [ MUSIC ]
(Jeremy)>> There it goes! Look at that!
(Jimmy)>> There it goes.
(Jeremy)>> And then all we've got left is the antenna. Shazam, I'll take it! That was simple enough.
(Jimmy)>> Yeah it was pretty easy. [ MUSIC ]
(Jeremy)>> Alright got a couple more things to do on the interior here. We're gonna go ahead and pull the convertible top off. Then we're gonna come down here and drill out these seat risers, but first I'll start right here with the top. Get inside this thing and take out a couple of bolts. [drill humming ]
(Jeremy)>> Jimmy you want to give me a hand here? Get this thing out of here somehow, maybe? [ MUSIC ] If you guys are taller it may be a good idea to remove these stock seat brackets. What that's gonna allow you to do is slide your seat further back and get it sitting a little closer to the round and make this tiny car a little more comfortable to drive. [ drill humming ]
(Jeremy)>> After center punching our holes, we'll use our Matco Tools spot weld cutter. At first we'll just apply light pressure as we start to cut, and then once we get a hole we'll bare down on it and get rid of the weld. [ tapping metal ] [ clanging metal ]
(Jimmy)>> Coming up, we mockup and build mounts for our new seat, and then start building the backbone of our new roll cage.
(Jeremy)>> Well now that we have the interior out of the spec Miata, we're gonna go ahead and start building the roll cage and mounting up this Kirkey racing seat that we got from Summit Racing. Now Jimmy and I have already set it in here. So, we have a base idea where it's got to go. So, I'm gonna have him build the front part of the mount here and I'll go ahead and take care of the back cause that just bolts directly to the floor pan. Then once it's installed, we'll go ahead and start bending some tube and build the roll cage. That looks like about five inches. Using a piece of cardboard, we'll do a quick layout of the design and cut it up. That should work! Jimmy this is the front bracket for the seats. Can you whip two of those out? One's got to be bent one way; one's got to be bent the opposite way. Then I'll mount the back. [ MUSIC ] [ torch hissing ] [ MUSIC ]
(Jeremy)>> While Jimmy's making the brackets for the front of the seat I went ahead and drilled the holes to mount the rear of the seat. Now we're also gonna be adding these little spacers. They're gonna bring the seat up just a little bit and it's going to help disperse the load so the bolt doesn't pull right through the floor. [ welder crackling ]
(Jeremy)>> Alright, now we'll mount the seat. [ MUSIC ]
(Jimmy)>> Here you go, two brackets!
(Jeremy)>> Mark these. We'll get the seat installed then. [ MUSIC ] Alright, get the seat out of here, drill some holes, re-install it and be done. [ drill buzzing ] [ MUSIC ] [ drill humming ]
(Jimmy)>> We've got the seat installed in the car now. So, I can start working on the cage, and in most cases that starts with the main hoop. So, I'm gonna take some measurements at the car, cut and bend this tube, and we'll get it in. [ MUSIC ] To make the main hoop I find it a lot easier to measure from the center of the car out. So, what I'm doing with the string here is I tied one side to a bolt that's in the center of the dash, and there's a stud on this side that fixed the convertible top to the car and this is also in the center. So once I get this string in here, I can take our cheater tube, place it where our main hoop is gonna land, and then I can measure from the center out to our bend line, and then I can calculate the total length of tube we're gonna use. So, I've just got to get this on here. Then we'll start measuring. [ MUSIC ] Alright so all we're doing right now. Jeremy's gonna help me with this. We're just gonna measure for the center portion of the main hoop. This is obviously way too low for the main hoop but after we can take a height measurement and then total up for the length of the main hoop. That's about 17, okay.
From before we took a measurement for the total height of the main hoop from the package tray. So, we kinda know where we're gonna land to stay under the top.
(Jeremy)>> So on that mark you landed about 20 and three quarter, 21, something like that.
(Jimmy)>> 21 times 2, 17 times 2, seven and a half times two.
(Jeremy)>> So write all that down so you don't forget. 91 inches. [ saw buzzing ] [ MUSIC ] [ mechanical humming ]
(Jimmy)>> On the dot! [ mechanical humming ]
(Jimmy)>> Alright let's see how we did. [ MUSIC ] Yep, lands dead center in each pad. So that's pretty good. We'll tack it in, and then we can get to the rest of the roll cage.
(Jeremy)>> Don't go away. The assembly of our spec Miata roll cage takes shape with some added custom touches.
(Jimmy)>> I've got the main hoop in with a couple of down braces, and I can start moving forward. The next thing I'm gonna do is work on the harness bar and the diagonal brace for the main hoop. Something to note here that's very common with these cars is that the harness bar will actually go out behind the plane of the main hoop to make sure there's enough room to install the harnesses correct, and it's nothing too crazy but it will take some small adjustments and trimming to make sure the joints are good on both sides. I'm just gonna take a basic measurement here to get an idea of how long it will be, and I'll give myself some extra just to make sure. We're looking at about four feet, but I'll probably cut it at five, and that's where we'll start. [ saw buzzing ] [ mechanical humming ] [ MUSIC ] [ saw buzzing ] [ grinder buzzing ] [ MUSIC ]
(Jimmy)>> Alright so we've got the first bend and notch in the harness bar, and so now obviously you can see that it sits way behind the main hoop. So, I've got two more bends in it. One to bring it back in plane and then another bend to straighten it out. [ MUSIC ] [ mechanical humming ] [ MUSIC ]
(Jimmy)>> Alright everything looks parallel. [ mechanical humming ]
(Jimmy)>> And let's see.
(Jeremy)>> I bet it fits perfectly. Where you at, there-ish?
(Jimmy)>> Just above the seatbelt mount.
(Jeremy)>> That seems alright.
(Jimmy)>> Let me get my helmet and we'll tack it in.
(Jeremy)>> Okay I'll hold it. [ welder buzzing ]
(Jimmy)>> Flat foot. [ MUSIC ]
(Jimmy)>> Alright, installed! Cross brace, right there! [ MUSIC ] Eight and 15, 28 and 15! Alright now before we actually tack in these diagonal brace pieces I do have to fully weld this portion of this joint because this tube will cover it and I want to make sure that we get a full weld around every tube, and then once we do that and get these pieces tacked in we're actually gonna take this whole main hoop assembly all the way out, put it on the table, and fully weld all these joints. [ welder hissing ] [ grinder buzzing ] [ MUSIC ] [ welder hissing ] [ MUSIC ]
(Jeremy)>> It looks pretty.
(Jimmy)>> It should fit pretty nice.
(Jeremy)>> I hope so, otherwise you've got to do it all over again. You want it all the way to the leading edge, right?
(Jimmy)>> Yes!
(Jeremy)>> That'll work.
(Jimmy)>> Alright, just tack it in.
(Jeremy)>> Yeah, I'll hold it. [ MUSIC ]
(Jimmy)>> Alright we've got the back half of our cage installed. So now we can keep moving forward and work on the front.
(Jimmy)>> At a basic level building roll cages comes down to cutting, notching, and welding. Building roll cages for off road stuff is pretty subjective but building roll cages for race cars like this that compete in a specific class you have to make sure that you follow any rules specified in the rule book. [ saw buzzing ]
(Jimmy)>> Perfect! [ MUSIC ]
(Jeremy)>> Dude that cage looks great!
(Jimmy)>> Thanks, got a couple more things to weld up, and then get the harnesses in it and we'll be ready to move on.
(Jeremy)>> Yeah you go ahead and slam them in. We'll get it off of these blocks here, and then over on the hoist and keep rolling.
(Jimmy)>> We'll take the next steps turning our Mazda into a track titan.
(Jimmy)>> We've got the cage all wrapped up in the car and the only thing left to do is paint it along with the rest of the interior, and now we're ready to move on with the rest of the car.
(Jeremy)>> So the idea from here is to follow the spec rule book and turn our stock daily driver into a competitive track car. Now we already went ahead and bumped up the timing, and we swapped out the exhaust. Then we stripped the interior, added a role cage, and racing seat to make sure we were safe. So now the plan from here is to remove the sub-frame and trans to upgrade our clutch. With the sub-frame out, we'll tackle the suspension with a new set of struts and springs, plus throw in a bigger set of sway bars. To slow down in the corners we'll upgrade the brakes with a bigger set of pads and rotors, and then top them off with a custom set of wheels and track specific tires. At the end we'll wrap the whole thing up by taking care of the faded-out paint and do an easy color change to give it a fresh look. So, the next thing we're gonna tackle is the getting out the engine, the transmission, and the sub-frame. That way it's gonna make our lives a whole lot easier when it comes time to doing the clutch, the suspension, and the brakes. [ MUSIC ] Stripping down the top side of the engine is pretty easy. Just a couple of electrical connections... [ MUSIC ] ...we'll disconnect some hoses, and get rid of some fluids. Let's see if I can do this without making a huge mess but no guarantees. [ MUSIC ] That's a lot of coolant. [ MUSIC ] Slower is faster in this game and I don't want to have to mop up. [ MUSIC ] Nice! We'll take that. Cool, that'll work. Now we'll go up top. [ MUSIC ] Nice! [ MUSIC ] [ air hissing ] [ MUSIC ]
(Jeremy)>> Ooh, making a mess! [ MUSIC ] We'll have to disconnect the steering as well, and the heater core hoses. [ mechanical humming ] [ drill humming ]
(Jeremy)>> Next are the wheels and tires, followed by the calipers. And since we're gonna reuse these, we'll hang these up. [ MUSIC ] [ drill humming ]
(Jeremy)>> Alright guys, so what exactly are we doing? Well up underneath the Miata here is this sub-frame, or they also call it a cradle. Now what that does is it holds the engine, transmission, and the front suspension in the car, and then what they do is they just bolt this whole thing up into the body of the car. So, what we're gonna do is take this all down and set it on a set of jack stands with the engine, transmission, and front suspension in place. That's just gonna make it a whole lot easier to work on everything. They're pretty simple to get out. Just a series of bolts. So, we'll get these bolts out of here, set up some jack stands, get this thing on the ground. [ drill humming ] [ MUSIC ] [ drill humming ]
(Jeremy)>> Okay so now we're gonna pull the sub-frame out, but all we're gonna do is just loosen the bolts a little bit, and then we're gonna set this thing down on the ground on a set of jack stands. Then we'll come back, take the bolts out the rest of the way, and pick the car up. [ drill humming ] [ MUSIC ] [ drill humming ] [ MUSIC ] [ mechanical humming ]
(Jeremy)>> Alright Jimmy, you want to watch that side so we don't catch anything? [ mechanical humming ]
(Jeremy)>> I think we're clear. I don't know if I forgot anything. [ mechanical humming ]
(Jimmy)>> I don't see anything hanging.
(Jeremy)>> That's pretty simple. That's definitely the way to do it, drop everything clean out. Even if you don't have a hoist you can still do it that way. I mean it's a little easier for us. We get to pick it up, but you could still take the cradles out from underneath it, and guys find interesting ways to get the bodies up off top of them.
(Jimmy)>> Just like researching what everyone else did that's how we figured this out.
(Jeremy)>> Yeah that's a simple way to do that.
(Jimmy)>> If you like anything you've seen on today's show be sure to check out more of Powernation TV.
